Stream live videos from Raspberry Pi on the internet
By the end of this tutorial you’ll have a live video stream that can be accessed from anywhere.
OVERVIEW
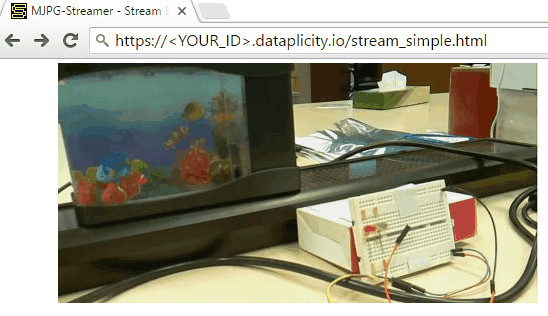
In this article we’ll show how to stream live videos from your Pi to a web browser. The technology that we’ve used to achieve that is an MJPG-streamer application and a Raspberry Pi camera. The end result is shown below.
PRE-REQUISITES
You will need:
- Raspberry Pi connected to the internet.
- Raspberry Pi camera
- Dataplicity installed. If you need some help to get up to speed, see Getting started with Dataplicity.
SET UP RASPBERRY PI CAMERA
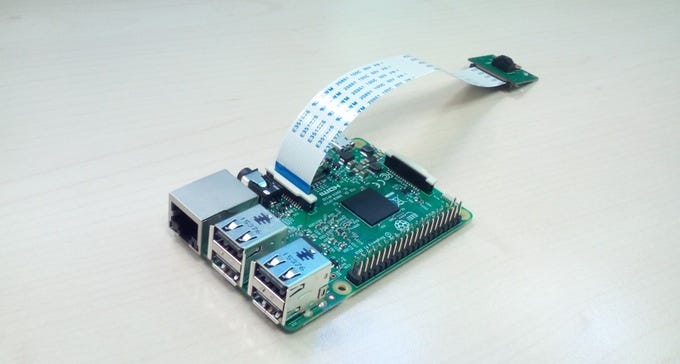
The first thing to do is to set up the camera and make sure it’s working. Connect the camera to your Pi as show below with the blue marking on the camera tape connector facing the ethernet port.
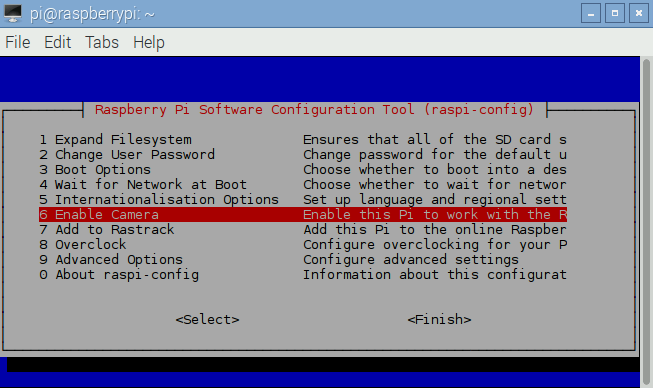
After the camera is physically connected you have to enable it. This is done using the native Raspberry Pi configuration tool —
raspi-config . Run the tool using the command below.sudo raspi-config
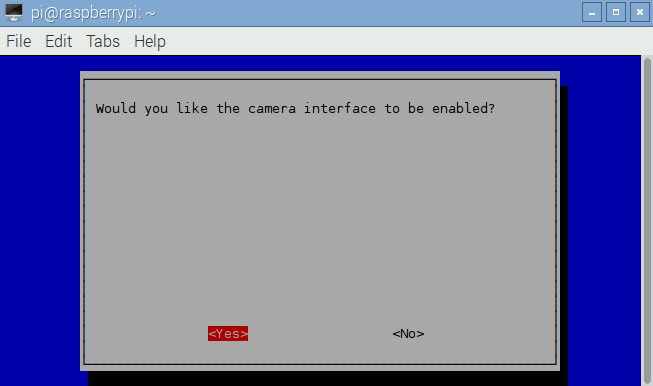
A menu with different configuration options will appear. Navigate to Enable camera and press enter.
Select Yes option and press enter.
From the main menu exit
raspi-config by pressing the right arrow twice to navigate to the "<Finish>" option and press enter to exit. You will be prompted to reboot your Raspberry Pi for changes to take effect - select Yes.TEST THE CAMERA
To test that the camera is functioning correctly we’ll take one image and save it to /home/pi using the command below.
raspistill -o /home/pi/image.jpg
When the command is executed you will see a camera preview appear on your display. The preview will stay on for few seconds and then an image will be taken.
RASPBERRY PI CAMERA AS USB VIDEO DEVICE
The Raspberry Pi camera can appear in /dev as a standard USB video device (required by MJPG) if we load the “Video for Linux 2” (V4L2) module for the corresponding hardware (BCM2835). We do this as follows:
sudo modprobe bcm2835-v4l2If you’re getting an error when trying to run the command above, be aware that “v4l2” is actually the lowercase version of “- V 4 L 2” instead of “- V 4 1 2”. The ‘l’ is the letter L, not the number 1.
Upon successful execution of this command you should see Video0 device file inside
/dev directory. To verify, run the command below.ls /dev | grep vid
UPDATE YOUR SYSTEM SOFTWARE
Prior to proceeding with the steps below please first make sure that the latest updates are installed on your Pi. To update your Pi run the two commands below.
sudo apt-get install update
sudo apt-get install upgrade
INSTALL PRE-REQUISITES
This project requires the presence of libjpeg-dev, imagemagick, libv4l-dev. Install them as follows:
sudo apt-get install libjpeg8-dev imagemagick libv4l-devBUILDING MJPG-STREAMER
The MJPG-streamer application doesn’t come in a package form that we can install using
sudo apt-get install command. Instead, what we have to do is to download and compile it from source code.
Source code usually comes in the form of a “tarball” i.e. multiple files packed together into an archive using the tar utility and then compressed using gzip utility to reduce the size of the archive.
Download MJPG-streamer tarball using the command below.
wget http://terzo.acmesystems.it/download/webcam/mjpg-streamer.tar.gz
Unpack the tarball as follows:
tar -xvzf mjpg-streamer.tar.gz
Make a symlink between two libraries that will be used to compile MJPG-streamer:
sudo ln -s /usr/include/libv4l1-videodev.h /usr/include/linux/videodev.h
Navigate into MJPG-streamer directory and edit Makefile using your favourite editor.
cd mjpg-streamer/ nano Makefile
In this file, comment out the input_gspcav1 plugin by inserting “ # “ at the beginning of the line, like so:
# PLUGINS += input_gspcav1.so
Finally, run
make to compile the program.make
Compilation should only take couple of seconds and should produce no errors. When successful we’ll have an MJPG-streamer application executable built.
RUN MJPG-STREAMER SERVER
The command below will run the server.
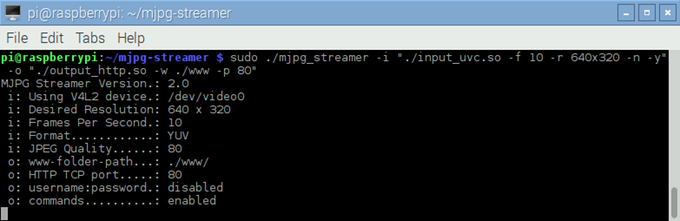
sudo ./mjpg_streamer -i "./input_uvc.so -f 10 -r 640x320 -n -y" -o "./output_http.so -w ./www -p 80"
If you see an output similar to the one below it means that the server is running correctly
ENABLE WORMHOLE
If you haven’t already done so, log in to your Dataplicity account and go to the device (e.g. the Pi) you want to link to. At the top of the page will be a link to ‘Activate Wormhole’.
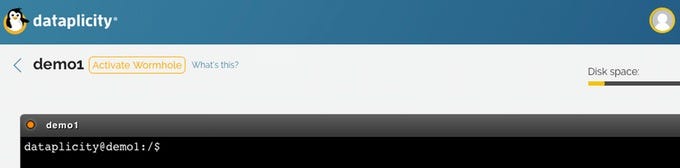
Press it and enable Wormhole. The link will contain your device ID.
ACCESS YOUR CAMERA VIDEO STREAM VIA DATAPLICITY WORMHOLE
To see our video stream embedded using HTML we’ll go to the address below (remember to replace <YOUR_ID> with your device Wormhole URL from your Dataplicity account).
https://<YOUR_ID>.dataplicity.io/stream_simple.html
Below is an example of the video captured from the above URL.
TROUBLESHOOTING THE VIDEO STREAM
You might find that sometimes your stream could crash, jitter or suffer high lag. This can happen if your Pi and/or your internet connection cannot sustain the video stream at the framerate and resolution you have selected.
> Breakdown of MJPG-streamer run command:
The MJPG-streamer itself contains couple of options. In the above command that we used to run the server we’ve set two options:
- “-i” is an option that takes path to an input plugin and the parameters to it.
- “-o” is an option that takes path to an output plugin and the parameters to it.
The parameters that we’ve used for the input plugin are:
- “-f” framerate — this sets how many frames are captured per second.
- “-r” resolution — this sets the size for the image we’re capturing
- “-n” This option suppresses the errors that show up when the command is ran. These errors show because our camera can’t be physically controlled. The errors have no impact on the streaming functionality but it’s nice to run the server without seeing them.
- “-y” Specifies YUV format for the output image.
The parameters that output option takes that we’re using are:
- “-w” path to folder where the website content is served from.
- “-p” port on which the website and stream is served on.
Accordingly, as we ran it above, mjpg_streamer was operating at a resolution of 640x320 and a framerate of 10 images per second. Here is the command to run it at a reduced 5 frames per second:
sudo ./mjpg_streamer -i "./input_uvc.so -f 5 -r 640x320 -n -y" -o "./output_http.so -w ./www -p 80"
No comments:
Post a Comment