Showing posts with label Special. Show all posts

Thursday, 9 June 2016

What is SSO(Single Sign On) in easy wording ?

What is SSO (Single Sign On)?

SSO (Single Sign On) means that when a user logs in to one application he will be "automatically" signed in to every other application, regardless of the platform, technology and domain.
For example, Google implements SSO for their products: Gmail, YouTube, Analytics, etc. When you turn on your computer and access Gmail, you login for the first time. Then, if you go to YouTube you won't be prompted for credentials again.
The way this works is by means of a "central service" (in the case of Google this is https://accounts.google.com). When you login for the first time a cookie gets created on this central service. Then, when you try to access the second application, you get redirected to the central service, but since you already have a cookie, you get redirected to the app directly with a token, which means you're already logged in.
Single-sign-on (SSO) is now required more than ever. In this two-piece post we will study how SSO is implemented for the web and provide a working example using OpenID Connect (in part 2). Read on!

Federated identity glossary

The concept of a centralized or linked electronic identity is known as federated identity. Federated identity systems handle several concerns:
  • Authentication
  • Authorization
  • User attributes exchange
  • User management
The authentication aspect deals with validating user credentials and establishing the identity of the user. Authorization is related to access restrictions (e.g., is the user allowed to access X resource?). The attributes exchange aspect deals with data sharing across different user management systems. For instance, fields such as "real name" may be present in multiple systems. A federated identity system prevents data duplication by linking the related attributes. Lastly, user management is related to the administration (creation, deletion, update) of user accounts. A federated identity system usually provides the means for administrators (or users) to handle accounts across domains or subsystems.
SSO is strictly related to the authentication part of a federated identity system. Its only concern is establishing the identity of the user and then sharing that information with each subsystem that requires the data. Below, we focus on this crucial aspect of a federated identity system.

Single sign on (SSO)

Sooner or later web development teams face one problem: you have developed an application at domain X and now you want your new deployment at domain Y to use the same login information as the other domain. In fact, you want more: you want users who are already logged-in at domain X to be already logged-in at domain Y. This is what SSO is all about.
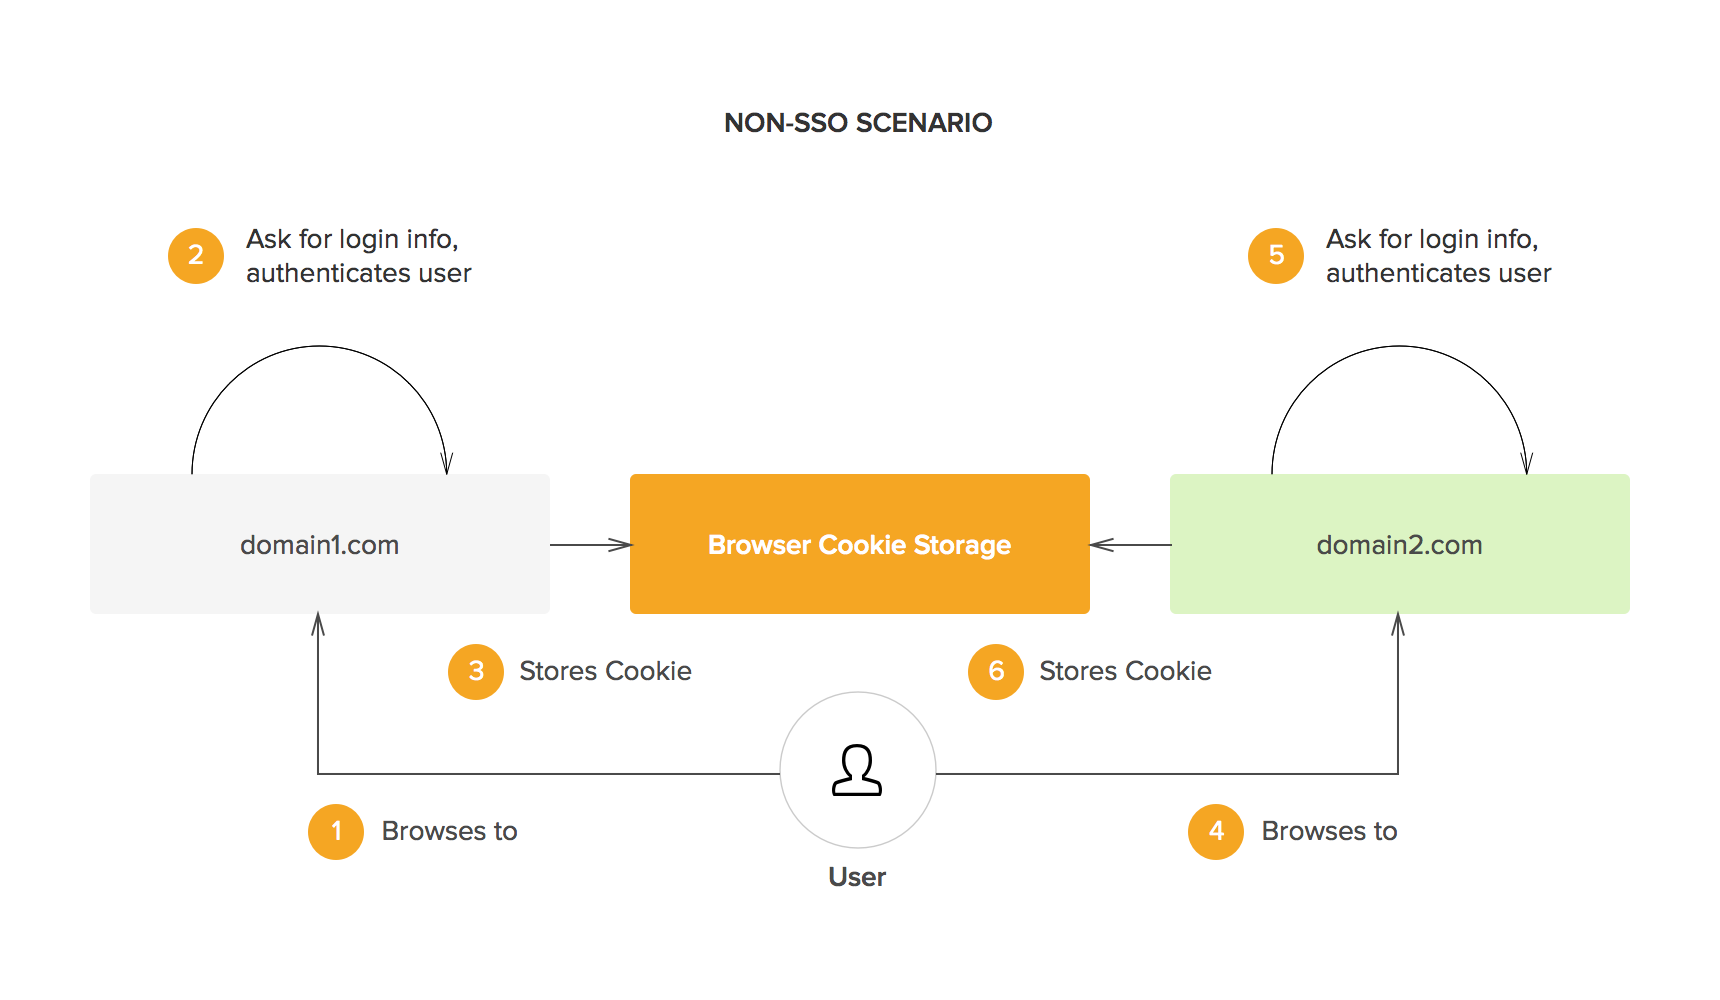
Single sign on question
The obvious solution to this problem is to share session information across different domains. However, for security reasons, browsers enforce a policy known as the same origin policy. This policy dictates that cookies (and other locally stored data) can only be accessed by its creator (i.e. the domain that originally requested the data to be stored). In other words, domain X cannot access cookies from domain Y or vice versa. This is what SSO solutions solve in one way or the other: sharing session information across different domains.
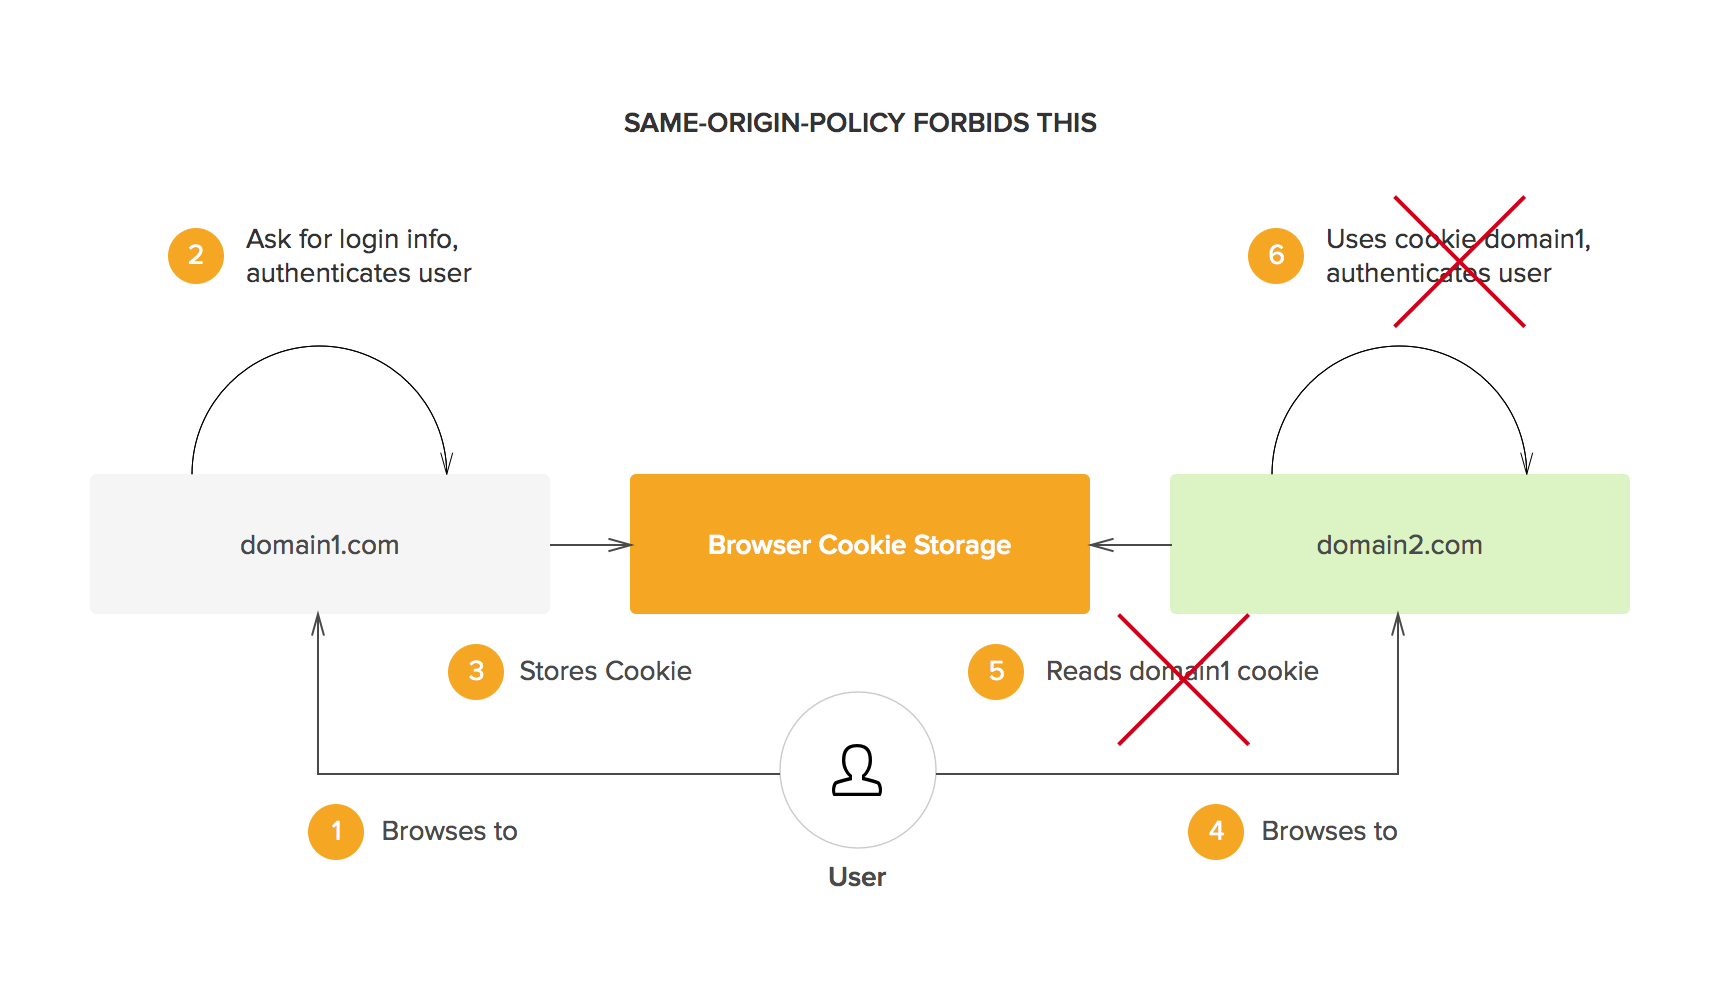
No cookie sharing
Different SSO protocols share session information in different ways, but the essential concept is the same: there is a central domain, through which authentication is performed, and then the session is shared with other domains in some way. For instance, the central domain may generate a signed JSON Web Token (which may be encrypted using JWE). This token may then be passed to the client and used by the authentication domain as well as any other domains. The token can be passed to the original domain by a redirect and contains all the information needed to identify the user for the domain requiring authentication. As the token is signed, it cannot be modified in any way by the client.
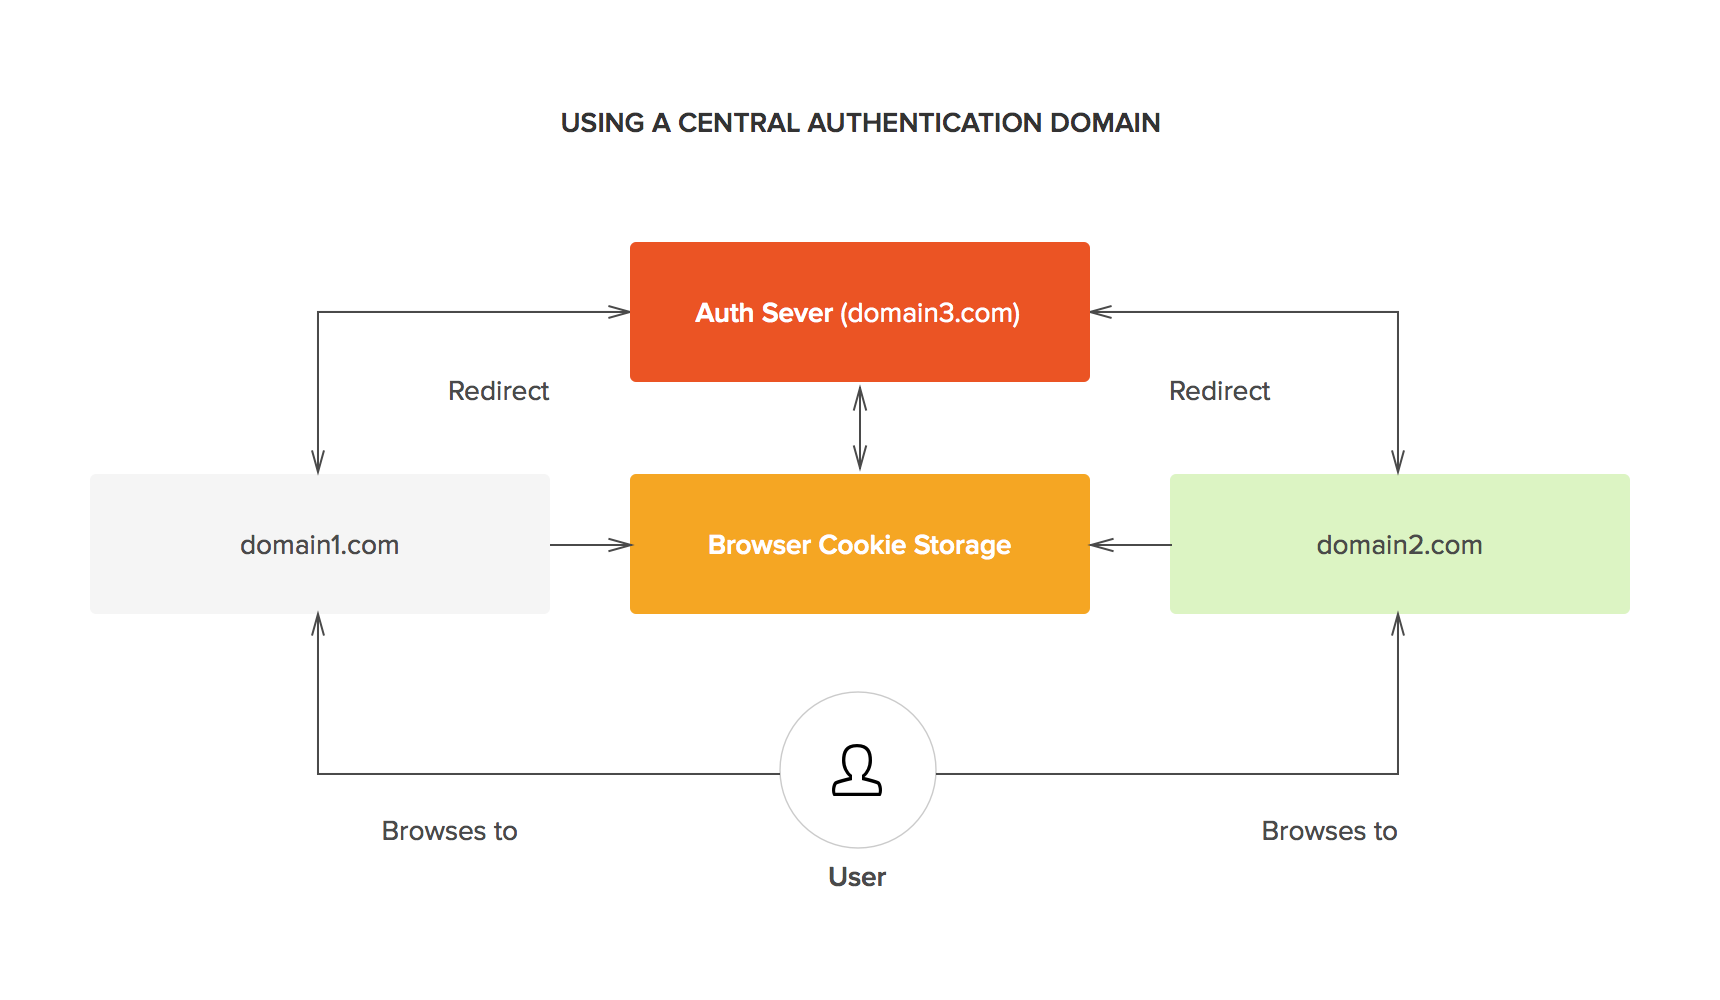
Central authentication domain
Whenever the user goes to a domain that requires authentication, he or she isredirected to the authentication domain. As the user is already logged-in at that domain, he or she can be immeditely redirected to the original domain with the necessary authentication token.
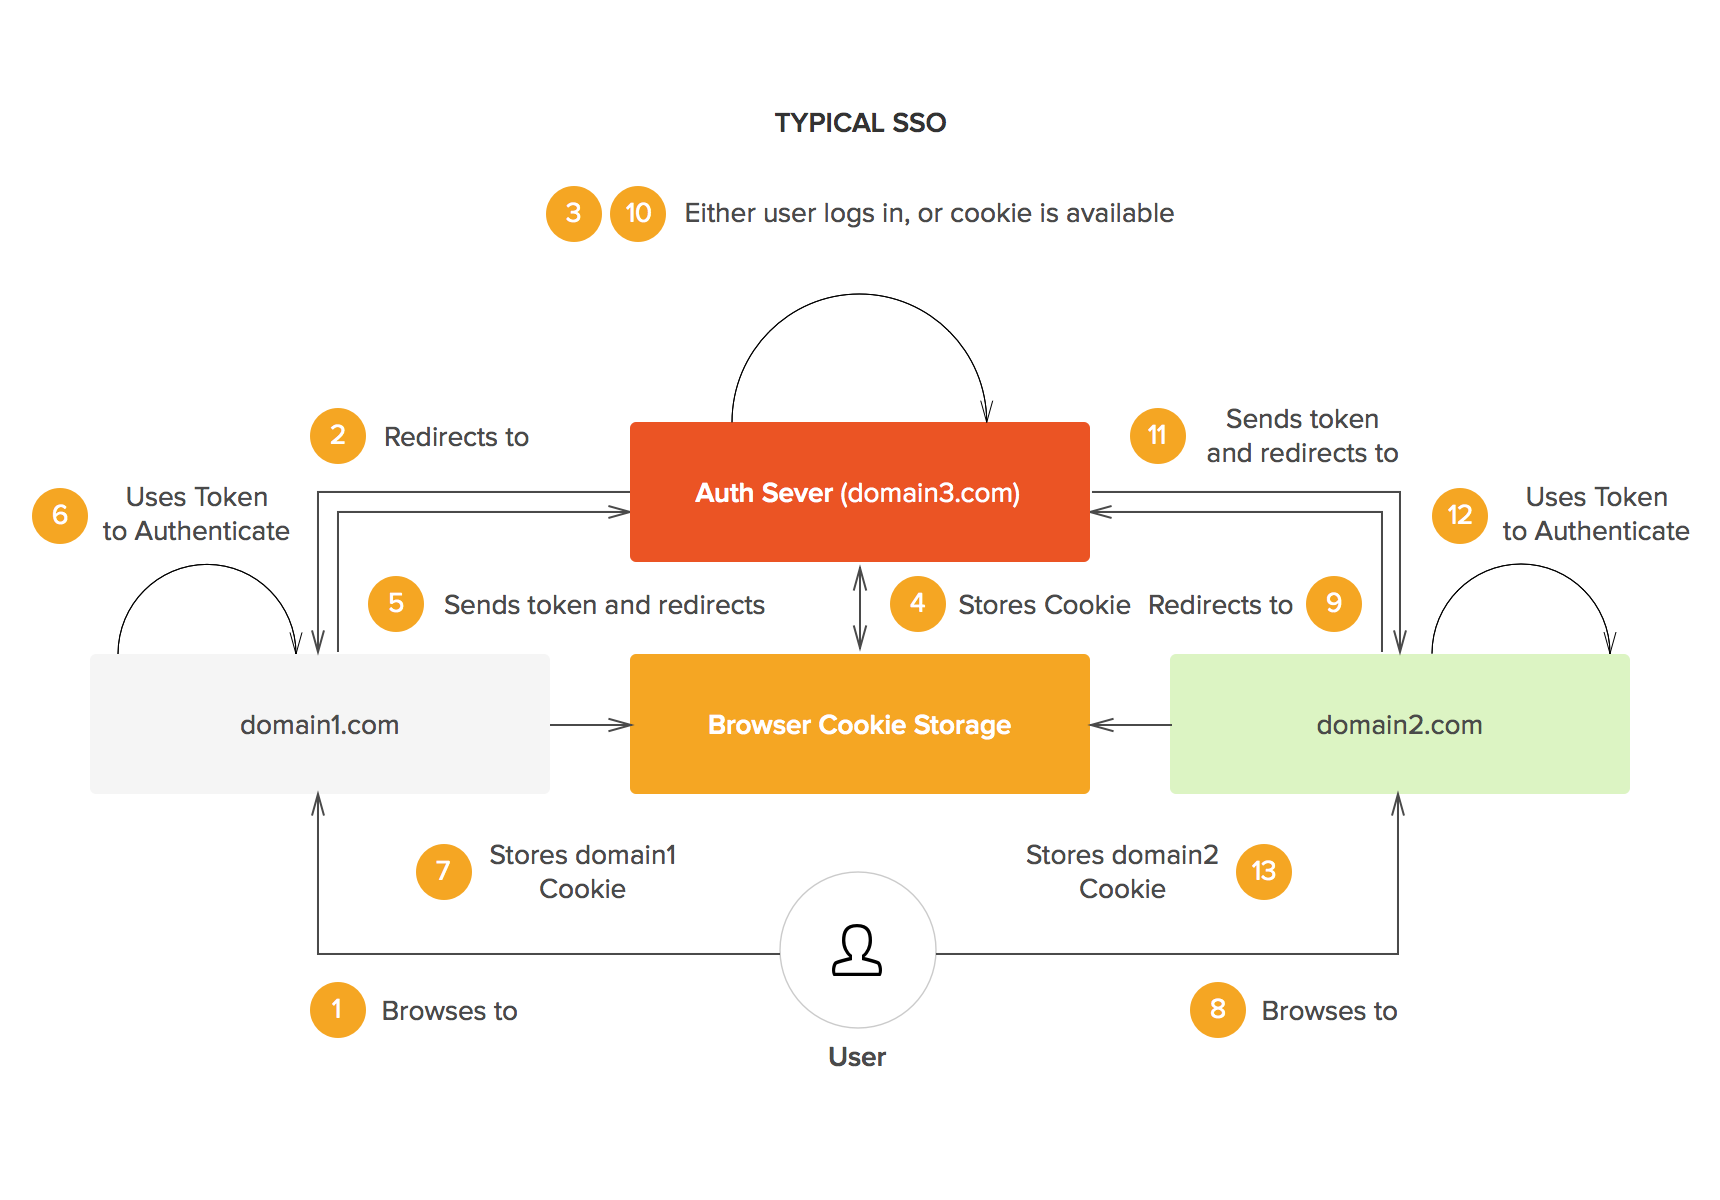
Single sign on

Different protocols

If you have been reading about SSO online, you have probably found that there are many different implementations: OpenID Connect, Facebook Connect, SAML, Microsoft Account (formerly known as Passport), etc. Our advice is to choose whatever is simplest for your development efforts. For instance, SAML is deeply entrenched in enterprise developments, so in some cases it will make sense to pick that. If you think you will need to integrate your development with more than one alternative, don't despair: there are frameworks that allow interoperability between different SSO solutions. In fact, that's one of the things we do at Auth0.

Aside: SSO with Auth0

If you are already using Auth0 in your developments, you know how easy it is to do SSO. If not, please see the docs on single sign on and check out the examples. Our SSO solution works as a bridge between different SSO frameworks. So whatever your existing apps are using, it has never been easier to integrate SSO into them. We do the hard work for you.
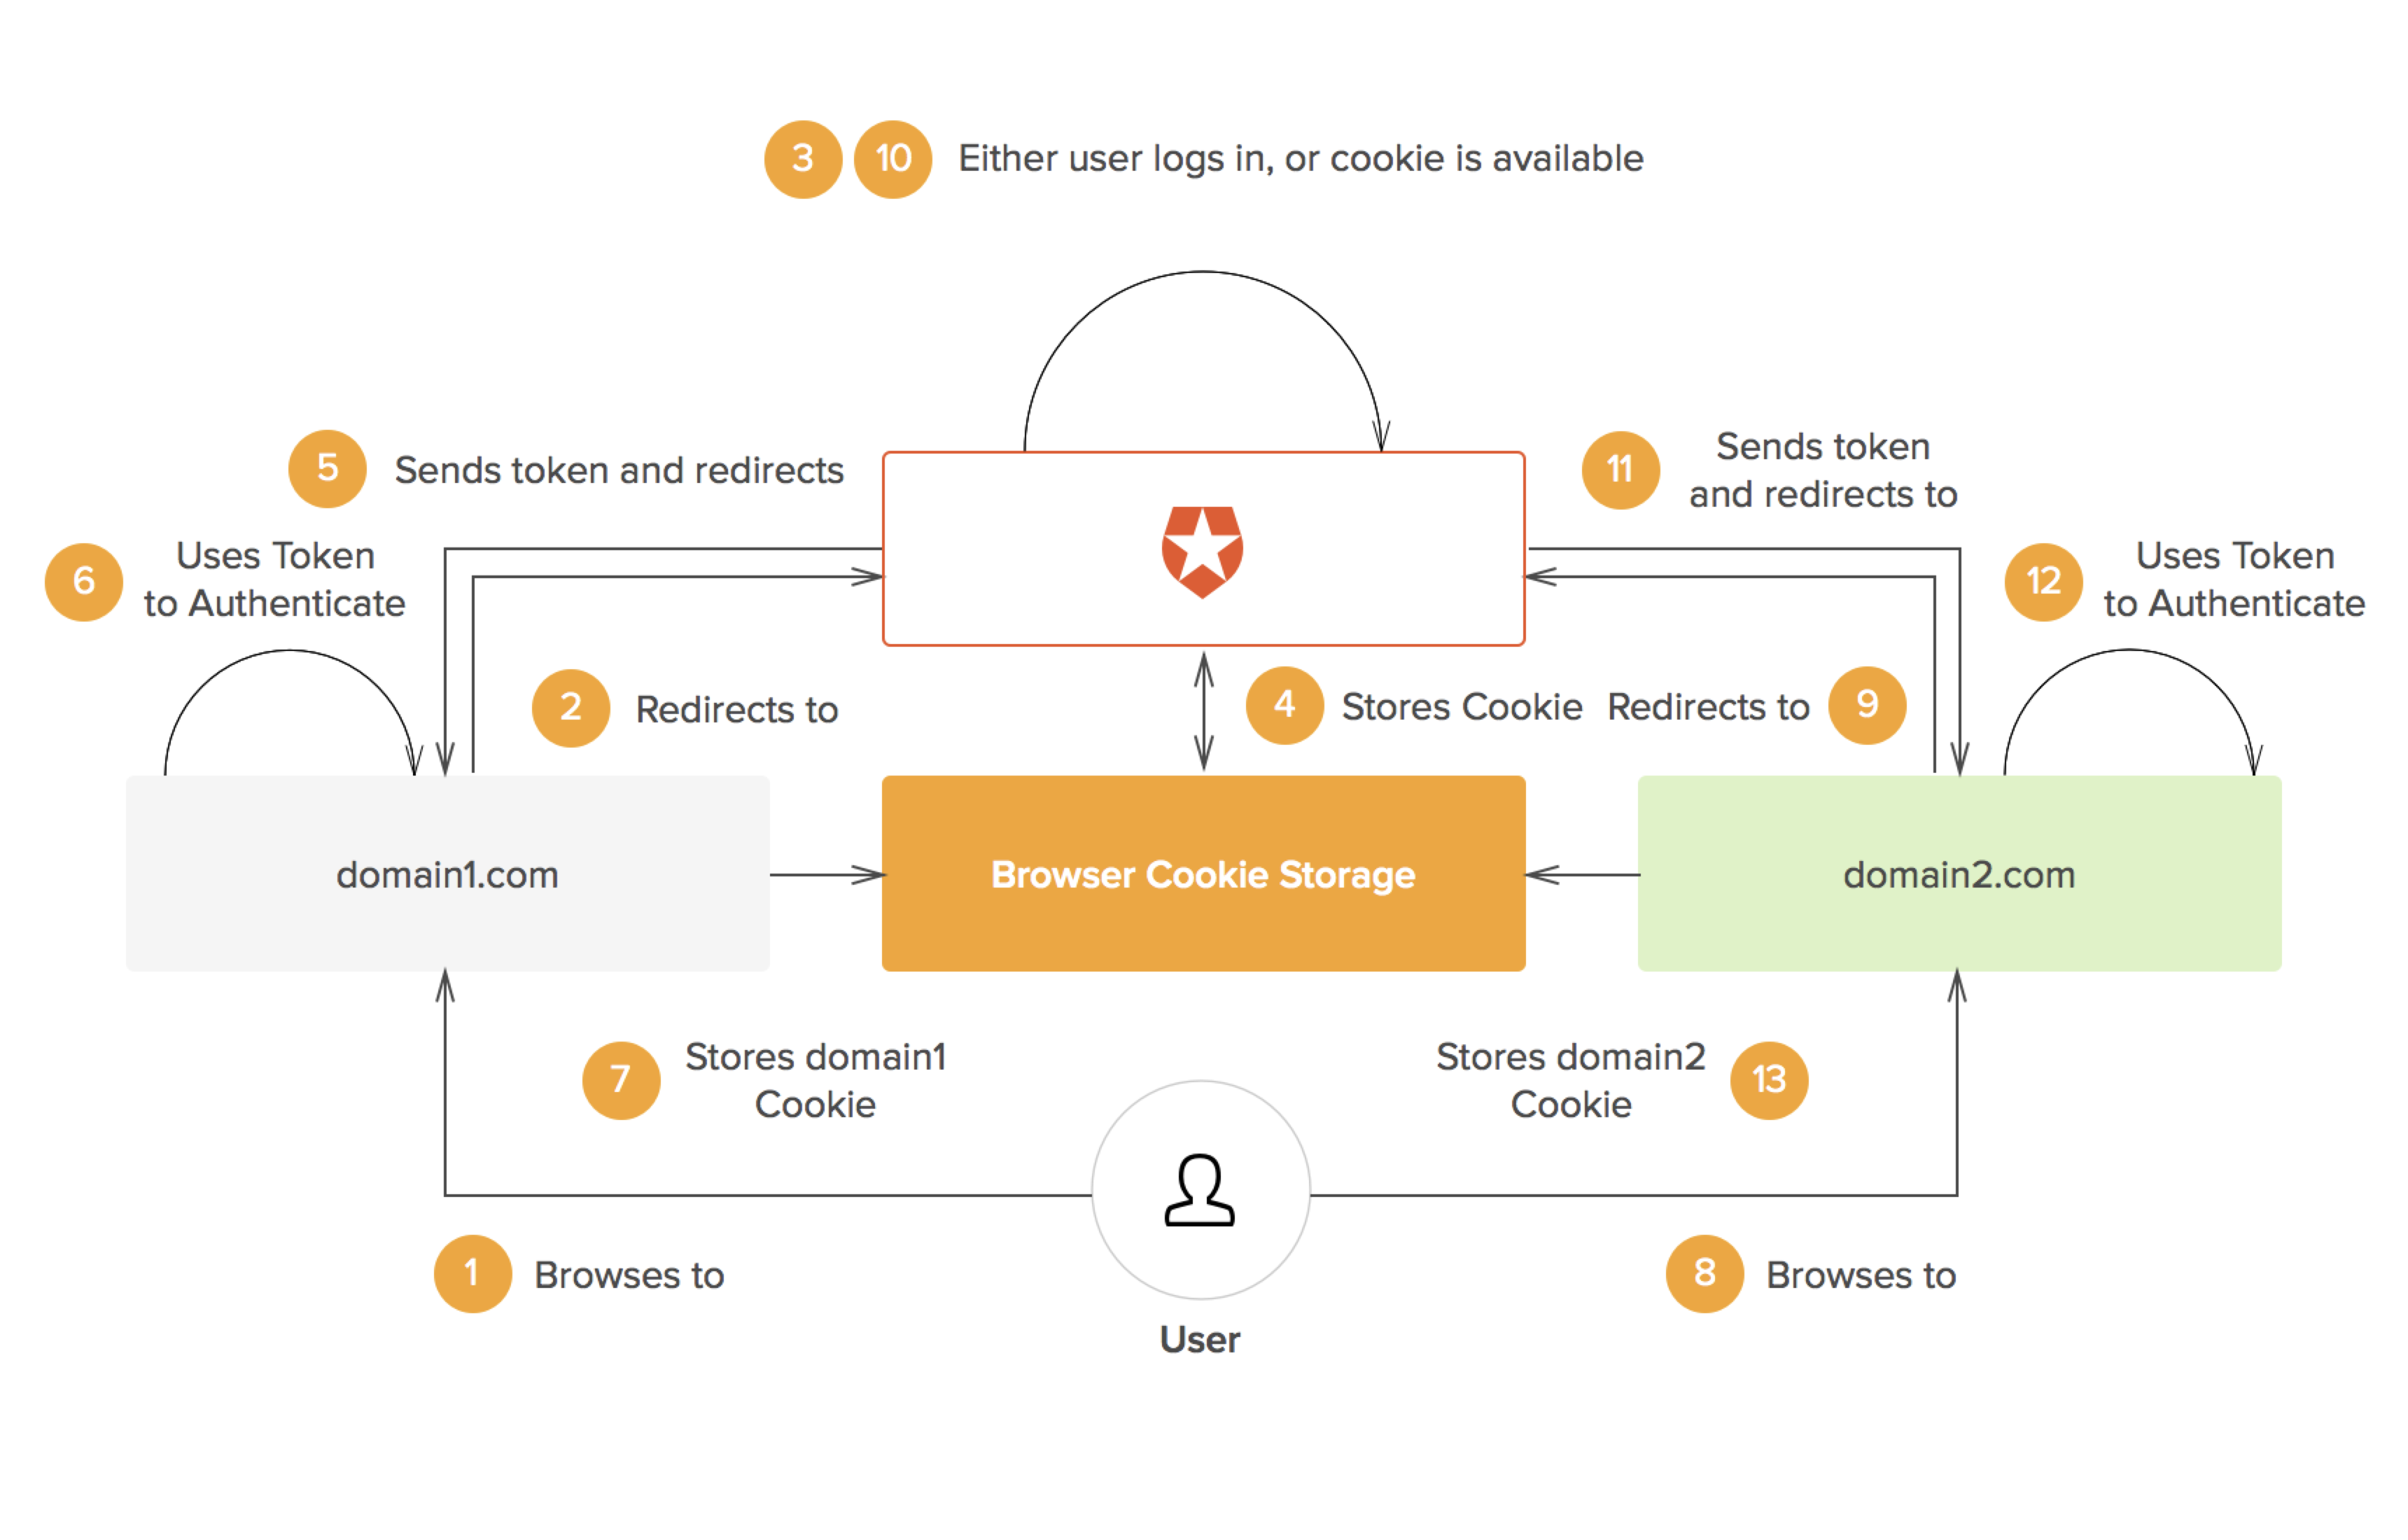
SSO with Auth0

Conclusion

SSO is here to stay. Decentralized systems are becoming more and more common and authentication is an essential aspect of all of them. SSO solves a big problem: how to manage the increasing number of users across a whole ecosystem of applications and services. Frameworks such as OpenID Connect and services such as the one we provide at Auth0 make integrating Single Sign On into your new or existing applications much easier. If you are implementing authentication for a new application or service, consider integrating SSO from the get-go.
Reference Link:

Wednesday, 27 April 2016

How to limit a process to a single CPU core?


You probably know how to limit processor to a single core for specific process e.g. some games are required to use on single core only to get best performance in such case you can use this one.


If you're running Windows Vista/7 (p ossibly XP, but not sure).
Type in: Control+Shift+Esc to get your taskmanager up.
Click on the Processes tab
Find the process that needs its processor affinity changed
Right-click on the process
Click on "Set Affinity"
Here you can select which processor(s) your process will use.
Good luck!
EDIT: You have to be administrator to get this to work

You can use command Line as well

from the command line, use
start /affinity 1 program.exe
this will run program.exe on the first CPU as "1" is the hex value of the affinity mask
CPU3 CPU2 CPU1 CPU0  Bin  Hex
---- ---- ---- ----  ---  ---
OFF  OFF  OFF  ON  = 0001 = 1
OFF  OFF  ON   OFF = 0010 = 2
OFF  OFF  ON   ON  = 0011 = 3
OFF  ON   OFF  OFF = 0100 = 4
OFF  ON   OFF  ON  = 0101 = 5 
OFF  ON   ON   OFF = 0110 = 6
OFF  ON   ON   ON  = 0111 = 7
ON   OFF  OFF  OFF = 1000 = 8
ON   OFF  OFF  ON  = 1001 = 9
ON   OFF  ON   OFF = 1010 = A 
ON   OFF  ON   ON  = 1011 = B
ON   ON   OFF  OFF = 1100 = C
ON   ON   OFF  ON  = 1101 = D
ON   ON   ON   OFF = 1110 = E 
ON   ON   ON   ON  = 1111 = F 

Entire Windows Session to single core(Vista/7)
  1. Type bcdedit /set onecpu on on a command prompt
  2. Reboot the system.
  3. When you are done playing, type 2 - Type: bcdedit /set onecpu off and reboot again.
For Reference :
http://superuser.com/questions/309617/how-to-limit-a-process-to-a-single-cpu-core

Commands for Viewing and Managing Boot Configuration Data

BCD Editor (Bcdedit.exe) is a command-line utility that lets you view and manage the BCD store. To use BCD Editor:
1. Click Start, point to All Programs, and then click Accessories.
2. Right-click Command Prompt, and then click Run As Administrator.
3. Type bcdedit at the command prompt.

Create, import, export, and identify the entire BCD store.
Armed with the right set of commands, you can use bcdedit to:
  • Create, delete, and copy individual entries in the BCD store.
  • Set or delete entry option values in the BCD store.
  • Control the boot sequence and the boot manager.
  • Configure and control Emergency Management Services (EMS).
  • Configure and control boot debugging as well as hypervisor debugging. summarizes commands you can use when you are working with the BCD store.

Note that BCD Editor is an advanced command-line tool and you should attempt to modify the BCD store only if you are an experienced IT pro. As a safe¬guard, you should make a full backup of the computer prior to making any changes to the BCD store. Why? If you make a mistake, your computer might end up in a non-bootable state, and then you would need to initiate a recovery.

Here’s a list of commands you can use with BCD Editor and a description of what each does:
/bootdebugEnables or disables boot debugging for a boot application.
/bootemsEnables or disables Emergency Management Services for a boot application.
/bootsequenceSets the one-time boot sequence for the boot manager.
/copyMakes copies of entries in the store.
/create Creates new entries in the store.
/createstore Creates a new (empty) boot configuration data store.
/dbgsettings Sets the global debugger parameters.
/debug Enables or disables kernel debugging for an operating system entry.
/default Sets the default entry that the boot manager will use.
/delete Deletes entries from the store.
/deletevalue Deletes entry options from the store.
/displayorder Sets the order in which the boot manager displays the multiboot menu.
/ems Enables or disables Emergency Management Services for an operating system entry.
/emssettings Sets the global Emergency Management Services parameters.
/enum Lists entries in the store.
/export Exports the contents of the system store to a file. This file can be used later to restore the state of the system store.
/hypervisorsettings Sets the hypervisor parameters.
/import Restores the state of the system store by using a backup file created with the /export command.
/mirror Creates a mirror of entries in the store.
/set Sets entry option values in the store.
/sysstore Sets the system store device. This only affects EFI systems.
/timeout Sets the boot manager timeout value.
/toolsdisplayorder Sets the order in which the boot manager displays the tools menu.
/v Sets output to verbose mode. 

FOR MORE DETAILS:

How to Generate List of StartUp Programs Using CMD OR POWERSHELL?


You Probably know how to get list of startup program just after User Log in Successfully using msconfig.

  1. win + R.


2.Type "msconfig" in Run. 


3. Select StartUp over there.


But if you want to do the same USING


Command Prompt

Step 1: Open the command prompt by going to StartRun and typing in CMD. If you are unfamiliar with the command prompt, feel free to read my command prompt beginner’s guide first.
command prompt
Step 2: Now type in the following WMI (Windows Management Instrumentation) command at the prompt and press Enter.
wmic startup get caption,command
You should now see a list of all the applications along with their paths that run at Windows startup.
cmd startup programs
If you want more information, you can also just type wmic startup and you’ll get a few extra fields like Location, UserSID and User.
Step 3: If you want to export the list out as a text file, type in the following command:
wmic startup get caption,command > c:\StartupApps.txt
And if you want to create an HTML file, just type this instead:
wmic startup get caption,command > c:\StartupApps.htm


PowerShell

If you prefer to use the more modern and powerful PowerShell, the command below will give you pretty much the same results as the WMI command above.
Get-CimInstance Win32_StartupCommand | Select-Object Name, command, Location, User | Format-List 
powershell startup programs
If you want to send the output of a PowerShell command to a text file, you can simply append the following part to the above command after Format-List.
| Out-File c:\scripts\test.txt
Make sure to include the pipe symbol | that is at the very front. I actually prefer the output of PowerShell because the formatting is much easier to view in a text editor.

That’s about it. You should now have a list of startup programs that you can save and reference later. If you have any questions, feel free to post a comment. Enjoy!

Thursday, 18 February 2016

Determinant of Matrix of (N x N) ORDER


This is gonna be the shortest and most efficient way to find determinant of N x N order my OWN new LOGIC.


Coding :
#include<stdio.h>
#include<iostream>
using namespace std;
int main()
{
    float arr[10][10];
    float div[10],sub[10];
    int n;
    cout << "Entr Order of matrix :- ";
    cin >> n;
    cout << endl;
    for(int i=0;i<n;i++)
    {
        if(i==0)
            cout << (i+1) << "st Row of MATRIX: \n";
        else if(i==1)
            cout << (i+1) << "nd Row of MATRIX: \n";
        else if(i==2)
            cout << (i+1) << "rd Row of MATRIX: \n";
        else
            cout << (i+1) << "th Row of MATRIX: \n";
        for(int j=0;j<n;j++)
            cin >> arr[i][j];
        cout << endl;
    }
    cout << endl << endl << "--------YOUR ENTERED MATRIX--------- " << endl;
    for(int i=0;i<n;i++)
    {
        cout << endl;
        for(int j=0;j<n;j++)
        {
            cout << arr[i][j] << "  ";
        }
    }
    for(int k=0;k<(n);k++)
    {
        for(int i=k;i<n;i++)
        {
            for(int j=k;j<n;j++)
            {
                div[j] = arr[k+0][j] / arr[k+0][k+0];
                sub[j] = div[j]*arr[i+1][k+0];
            }
            for(int j=0;j<n;j++)
            {
                arr[i+1][j]-=sub[j];
            }
        }
    }

    float ans=1;
    for(int i=0;i<n;i++)
    {
        ans*=arr[i][i];
    }
    cout << endl << endl << "-------Determinant of Matrix = " << ans;
}

Saturday, 23 January 2016

Oen RUN dialogue box Using CMD and C programming

Hello Friends, I m back after very long with very small program to open RUN using Cmd nd C programming:--
1. Using C Program


#include<iostream>
#include<stdlib.h>
using namespace std;
int main()
{
    system("start c:\\WINDOWS\\system32\\rundll32.exe shell32.dll,#61");
    return 0;
}

 2. Using Cmg :-

It's nothing hi-fi like wifi just copy and paste this one line

start c:\\WINDOWS\\system32\\rundll32.exe shell32.dll,#61


How to install google-chrome in redhat without redhat subscription

Install google-chrome in redhat  Download the .rpm file of chrome https://www.google.com/chrome/thank-you.html?installdataindex=empty&st...