Sunday, 22 January 2017

How to install and run ns2 in Ubuntu in simplest Way


Installing Network Simulator 2 (NS2) on Ubuntu 14.04

1 Introduction

Network simulators are tools used to simulate discrete events in a network and which helps to predict the behaviours of a computer network. Generally the simulated networks have entities like links, switches, hubs, applications, etc. Once the simulation model is complete, it is executed to analyse the performance. Administrators can then customize the simulator to suit their needs. Network simulators typically come with support for the most popular protocols and networks in use today, such as WLAN,UDP,TCP,IP, WAN, etc.
Most simulators that are available today are based on a GUI application like the NCTUNS while some others incl. NS2 are CLI based. Simulating the network involves configuring the state elements like links, switches, hubs, terminals, etc. and also the events like packet drop rate, delivery status and so on. The most important output of the simulations are the trace files. Trace files log every packet, every event that occurred in the simulation and are used for analysis. Network simulators can also provide other tools to facilitate visual analysis of trends and potential trouble spots. Most of the simulation is performed in discrete time intervals where events that are in the queue are processed one after the other in an order.
Since simulation is a complex task, we cannot guarantee that all the simulators can provide exact or accurate results for all the different type of information. Examples of network simulators are: ns, NCTUNS, NetSim, etc.
ns2 is a name for series of discrete event network simulators like ns-1, ns-2 and ns-3. All of them are discrete-event network simulators, primarily used in research and teaching. ns2 is free software, publicly available under the GNU GPLv2 license for research, development, and use.
This post deals with the installation of "ns2" also called the "network simulator 2" in Ubuntu 14.04.

2 Download and Extract ns2

Download the all in one package for ns2 from here
The package downloaded will be named "ns-allinone-2.35.tar.gz". Copy it to the home folder. Then in a terminal use the following two commands to extract the contents of the package.:
cd ~/
tar -xvzf ns-allinone-2.35.tar.gz
All the files will be extracted into a folder called "ns-allinone-2.35".

3 Building the dependencies

Ns2 requires a few packages to be pre installed. It also requires the GCC- version 4.3 to work correctly. So install all of them by using the following command:
sudo apt-get install build-essential autoconf automake libxmu-dev
One of the dependencies mentioned is the compiler GCC-4.3, which is no longer available, and thus we have to install GCC-4.4 version. The version 4.4 is the oldest we can get. To do that, use the follwoing command:
sudo apt-get install gcc-4.4
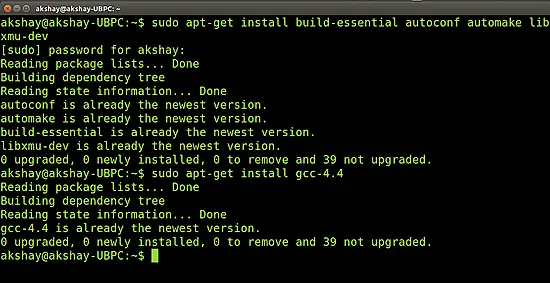
The image below shows the output of executing both the above commands. If you have all the dependencies pre-installed, as I did, the output will look like the image below:


Note : 
This very next step is not required in Ubuntu 16.04.
 
Once the installation is over , we have to make a change in the "ls.h" file. Use the following steps to make the changes:
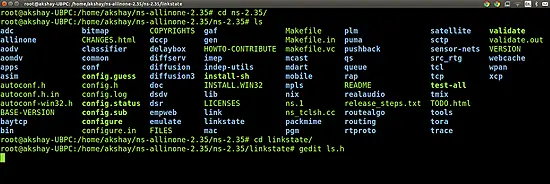
Navigate to the folder "linkstate", use the following command. Here it is assumed that the ns folder extracted is in the home folder of your system.
cd ~/ns-allinone-2.35/ns-2.35/linkstate
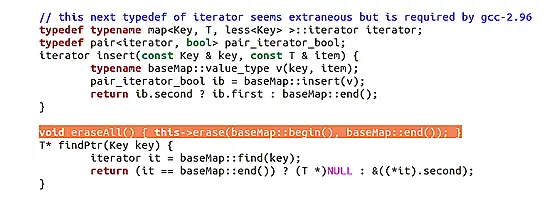
Now open the file named "ls.h" and scroll to the 137th line. In that change the word "error" to "this->error". The image below shows the line 137 (highlighted in the image below) after making the changes to the ls.h file.To open the file use the following command:
gedit ls.h
Save that file and close it.


Now there is one more step that has to be done. We have to tell the ns which version of GCC will be used. To do so, go to your ns folder and type the following command:
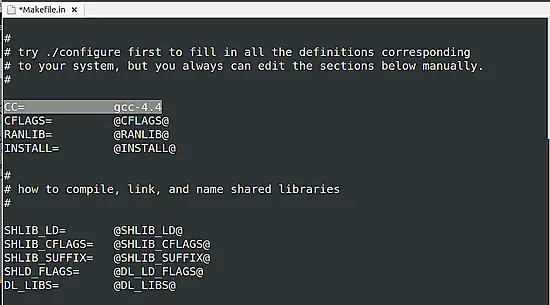
Sudo gedit ns-allinone-2.34/otcl-1.13/Makefile.in


In the file, change Change CC= @CC@ to CC=gcc-4.4, as shown in the image below.
 

4 Installation

Now we are ready to install ns2. To do so we first require root privileges and then we can run the install script. Use the following two commands:
sudo su cd ~/ns-allinone-2.35/./install
The following is a snap of these commands:

The image below shows how it looks upon successful execution
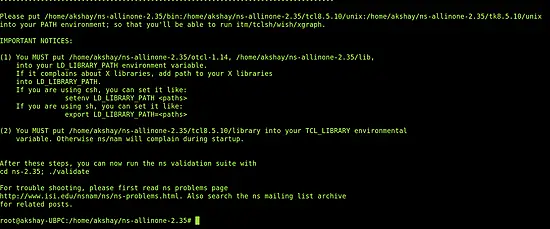
It took almost 6 minutes to build and install ns2 on my system. But before we run it, we need to add the build path to the environment path.

5 Setting the Environment Path

The final step is to tell the system, where the files for ns2 are installed or present. To do that, we have to set the environment path using the ".bashrc" file. In that file, we need to add a few lines at the bottom. The things to be added are given below. But for the path indicated below, many of those lines have "/home/system/ns-allinone-2.35/...." , but that is where I have my extracted folder. Make sure you replace them with your path. For example, if you have installed it in a folder "/home/Download", then replace "/home/system/ns-allinone-2.35/otcl-1.14" with "/home/system/ns-allinone-2.35/otcl-1.14".
Do this for all the required lines.

sudo gedit ~/.bashrc
Lines to be added:
# LD_LIBRARY_PATH
OTCL_LIB=/home/system/ns-allinone-2.35/otcl-1.14
NS2_LIB=/home/system/ns-allinone-2.35/lib
X11_LIB=/usr/X11R6/lib
USR_LOCAL_LIB=/usr/local/lib
export LD_LIBRARY_PATH=$LD_LIBRARY_PATH:$OTCL_LIB:$NS2_LIB:$X11_LIB:$USR_LOCAL_LIB
# TCL_LIBRARY
TCL_LIB=/home/system/ns-allinone-2.35/tcl8.5.10/library
USR_LIB=/usr/lib
export TCL_LIBRARY=$TCL_LIB:$USR_LIB
# PATH
XGRAPH=/home/system/ns-allinone-2.35/bin:/home/system/ns-allinone-2.35/tcl8.5.10/unix:/home/akshay/ns-allinone-2.35/tk8.5.10/unix
#the above two lines beginning from xgraph and ending with unix should come on the same line
NS=/home/system/ns-allinone-2.35/ns-2.35/ 
NAM=/home/system/ns-allinone-2.35/nam-1.15/ 
PATH=$PATH:$XGRAPH:$NS:$NAM
 
Once the changes have been made, save the file and restart the system.

6 Running ns2

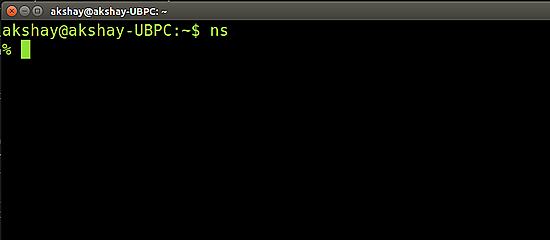
Once the system has restarted, open a terminal and start ns2 by using the following command:
ns
If the installation is correct then the terminal looks like the image below :

Reference Link:
https://www.howtoforge.com/tutorial/ns2-network-simulator-on-ubuntu-14.04/ 

Wednesday, 18 January 2017

How to create OPENMPI CLUSTER ?


Setting Up an MPICH2 Cluster in Ubuntu

This guide describes how to build a simple MPICH cluster in ubuntu.
To understand the guide, a basic knowledge of command line usage and the principle mpich
& clustering is assumed.
Here we have 4 nodes running Ubuntu server with these host names: ub0,ub1,ub2,ub3;

1. Defining hostnames in etc/hosts/
Edit /etc/hosts like these:


127.0.0.1     localhost
192.168.133.100 ub0
192.168.133.101 ub1
192.168.133.102 ub2
192.168.133.103 ub3
Note that the file shouldn't be like this:
127.0.0.1     localhost
127.0.1.1     ub0
192.168.133.100 ub0
192.168.133.101 ub1
192.168.133.102 ub2
192.168.133.103 ub3
or like this:
127.0.0.1     localhost
127.0.1.1     ub0
192.168.133.101 ub1
192.168.133.102 ub2
192.168.133.103 ub3
otherwise other hosts will try to connect to localhost when they try to reach ub0.

2. Installing NFS
NFS allows us to create a folder on the master node and have it synced on all the other nodes.
https://help.ubuntu.com/community/MpichCluster


MpichCluster ­ Community Help Wiki
This folder can be used to store programs. To Install NFS just run this in the master node's
terminal:


omid@ub0:~$ sudo apt‐get install nfs‐server


To install the client program on other nodes run this command on each of them:
omid@ub1:~$ sudo apt‐get install nfs‐client


Note: if you want to be more efficient in controlling several nodes using same
commands, ClusterSSH is a nice tool and you can find a basic two­line tutorial here.
3. Sharing Master Folder
Make a folder in all nodes, we'll store our data and programs in this folder.
omid@ub0:~$ sudo mkdir /mirror


And then we share the contents of this folder located on the master node to all the other
nodes. In order to do this we first edit the /etc/exports file on the master node to contain the
additional line
/mirror *(rw,sync)
This can be done using a text editor such as vim or by issuing this command:


omid@ub0:~$ echo "/mirror *(rw,sync)" | sudo tee ‐a /etc/exports
Now restart the nfs service on the master node to parse this configuration once again.

omid@ub0:~$ sudo service nfs‐kernel‐server restart


Note than we store out data and programs only in master node and other nodes will access
them with NFS.


4. Mounting /master in nodes
Now all we need to do is to mount the folder on the other nodes. This can be done manually
each time like this:
omid@ub1:~$ sudo mount ub0:/mirror /mirror
omid@ub2:~$ sudo mount ub0:/mirror /mirror
omid@ub3:~$ sudo mount ub0:/mirror /mirror

But it's better to change fstab in order to mount it on every boot. We do this by editing
/etc/fstab and adding this line:
ub0:/mirror    /mirror    nfs
and remounting all partitions by issuing this on all the slave nodes:
omid@ub1:~$ sudo mount ‐a
omid@ub2:~$ sudo mount ‐a
omid@ub3:~$ sudo mount ‐a


5. Defining a user for running MPI programs
We define a user with same name and same userid in all nodes with a home directory in
/mirror.
https://help.ubuntu.com/community/MpichCluster

MpichCluster ­ Community Help Wiki
Here we name it "mpiu"! Also we change the owner of /mirror to mpiu:
omid@ub0:~$ sudo chown mpiu /mirror

6. Installing SSH Server
Run this command in all nodes in order to install OpenSSH Server
omid@ub0:~$ sudo apt get install openssh‐server


7. Setting up passwordless SSH for communication
between nodes
First we login with our new user to the master node:
omid@ub0:~$ su ‐ mpiu
Then we generate an RSA key pair for mpiu:
mpiu@ub0:~$ ssh keygen  t rsa


You can keep the default ~/.ssh/id_rsa location. It is suggested to enter a strong passphrase for
security reasons.
Next, we add this key to authorized keys:
mpiu@ub0:~$ cd .ssh
mpiu@ub0:~/.ssh$ cat id_rsa.pub >> authorized_keys


As the home directory of mpiu in all nodes is the same (/mirror/mpiu) , there is no need to run
these commands on all nodes. If you didn't mirror the home directory, though, you can use
ssh‐copy‐id <hostname> to copy a public key to another machine's authorized_keys file
safely.

To test SSH run:
mpiu@ub0:~$ ssh ub1 hostname

 
If you are asked to enter a passphrase every time, you need to set up a keychain. This is done
easily by installing... Keychain.
mpiu@ub0:~$ sudo apt‐get install keychain
 
And to tell it where your keys are and to start an ssh­agent automatically edit your ~/.bashrc
file to contain the following lines (where id_rsa is the name of your private key file):
if type keychain >/dev/null 2>/dev/null; then
  keychain ‐‐nogui ‐q id_rsa
  [ ‐f ~/.keychain/${HOSTNAME}‐sh ] && . ~/.keychain/${HOSTNAME}‐sh
  [ ‐f ~/.keychain/${HOSTNAME}‐sh‐gpg ] && . ~/.keychain/${HOSTNAME}‐sh‐gpg
fi
Exit and login once again or do a source ~/.bashrc for the changes to take effect.
Now your hostname via ssh command should return the other node's hostname without asking
for a password or a passphrase. Check that this works for all the slave nodes.


8. Installing GCC
https://help.ubuntu.com/community/MpichCluster

MpichCluster ­ Community Help Wiki
To be able to compile all the code on our master node (it's sufficient to do it only there if we
do it inside the /mirror folder and all the libraries are in place on other machines) we need a
compiler.
You can get gcc and other necessary stuff by installing the build­essential package:
mpiu@ub0:~$ sudo apt‐get install build‐essential


9.Installing Other Compilers
Other prefered compilers should be installed before installing MPICH.
In this step you may install other compilers such as Inter Fortran, SGI compiler , ...


10. Installing MPICH2
Now the last ingredient we need installed on all the machines is the MPI implementation. You
can install MPICH2 using Synaptic by typing:
sudo apt‐get install mpich2
Alternatively, MPICH2 can be installed from source as explained in the MPICH installer
guide or you can try using some other implementation such as OpenMPI.
To test that the program did indeed install successfully enter this on all the machines:
mpiu@ub0:~$  which mpiexec
mpiu@ub0:~$  which mpirun


11. setting up a machinefile
Create a file called "machinefile" in mpiu's home directory with node names followed by a
colon and a number of processes to spawn:
ub3:4  # this will spawn 4 processes on ub3
ub2:2  # this will spawn 2 processes on ub2
ub1    # this will spawn 1 process on ub1
ub0    # this will spawn 1 process on ub0

11. Testing
Change directory to your mirror folder and write this MPI helloworld program in a file
mpi_hello.c (courtesy of this blog):

#include <stdio.h>
#include <mpi.h>
int main(int argc, char** argv) {
    int myrank, nprocs;
    MPI_Init(&argc, &argv);
    MPI_Comm_size(MPI_COMM_WORLD, &nprocs);
    MPI_Comm_rank(MPI_COMM_WORLD, &myrank);
    printf("Hello from processor %d of %d\n", myrank, nprocs);
    MPI_Finalize();
    return 0;
}

 
https://help.ubuntu.com/community/MpichCluster
MpichCluster ­ Community Help Wiki
Compile it:
mpiu@ub0:~$ mpicc mpi_hello.c ‐o mpi_hello
and run it (the parameter next to ­n specifies the number of processes to spawn and distribute
among nodes):

mpiu@ub0:~$ mpiexec ‐n 8 ‐f machinefile ./mpi_hello
 
You should now see output similar to this:
Hello from processor 0 of 8
Hello from processor 1 of 8
Hello from processor 2 of 8
Hello from processor 3 of 8
Hello from processor 4 of 8
Hello from processor 5 of 8
Hello from processor 6 of 8
Hello from processor 7 of 8
Congratulations! You have a working MPI platform
References
For more information visit:
The official MPICH webpage
The official MPICH documentation
SSHing without a key
Using Keychain to store passphrases
A blog post explaining single­node installation of OpenMPI
MpichCluster (last edited 2015­05­25 20:51:36 by heemayl @
119.30.38.159[119.30.38.159]:heemayl)
https://help.ubuntu.com/community/MpichCluster
5/5

Monday, 9 January 2017

Kernel Compilation in Easiest Step

Linux kernel is the life force of all Linux family of operating systems including Ubuntu, CentOS, and Fedora.
For most part, you don’t need to compile the kernel, as it is installed by default when you install the OS. Also, when there is a critical update done to the kernel, you can use yum, or apt-get to update the kernel on your Linux system.

However you might encounter certain situation, where you may have to compile kernel from source. The following are few situation where you may have to compile Kernel on your Linux system.

Need of Kernel Compilation :

  • To enable experimental features that are not part of the default kernel.
  • To enable support for a new hardware that is not currently supported by the default kernel.
  • To debug the kernel
  • Or, just to learn how kernel works, you might want to explore the kernel source code, and compile it on your own.
In this tutorial, we’ll explain how to compile Linux kernel from source.

1. Download the Latest Stable Kernel

The first step is to download the latest stable kernel from kernel.org.

# cd /usr/src/ 
 
OR you can directly go through command line 
 
# wget https://www.kernel.org/pub/linux/kernel/v3.x/linux-3.9.3.tar.xz

2. Untar the Kernel Source

The second step is to untar the kernel source file for compilation.

# tar -xvJf linux-3.9.3.tar.xz
 
Or you can directly extract it by double click on tar file 

3. Configure the Kernel

The kernel contains nearly 3000 configuration options. To make the kernel used by most people on most hardware, the Linux distro like Ubuntu, Fedora, Debian, RedHat, CentOS, etc, will generally include support for most common hardware. You can take any one of configuration from the distro, and on top of that you can add your own configuration, or you can configure the kernel from scratch, or you can use the default config provided by the kernel.

Do it as per your kernel version 
e.g. 
If you have downloaded linux 4.9.2 then 
# cd linux-4.9.2

else 

# cd linux-3.9.3 
 
 
Then   
 # make menuconfig
The make menuconfig, will launch a text-based user interface with default configuration options as shown in the figure. You should have installed “libncurses and libncurses-devel” packages for this command to work.

We will use the default config provided by the kernel. So select “Save” and save the config in the file name “.config”.
The following is a sample of the “.config” file:
CONFIG_MMU=y  CONFIG_NEED_DMA_MAP_STATE=y  CONFIG_NEED_SG_DMA_LENGTH=y  CONFIG_GENERIC_ISA_DMA=y  CONFIG_GENERIC_BUG=y  CONFIG_GENERIC_HWEIGHT=y

4. Compile the Linux Kernel


  • Compile the main kernel:
# make
  • Compile the kernel modules:
# make modules
  • Install the kernel modules:
# make modules_install
  • At this point, you should see a directory named /lib/modules/3.9.3/ in your system.

5. Install the New Kernel

Install the new kernel on the system:

# make install
 
The make install command will create the following files in the /boot directory.
  • vmlinuz-3.9.3 – The actual kernel
  • System.map-3.9.3 – The symbols exported by the kernel
  • initrd.img-3.9.3 – initrd image is temporary root file system used during boot process
  • config-3.9.3 – The kernel configuration file
The command “make install” will also update the grub.cfg by default. So we don’t need to manually edit the grub.cfg file.

6. Boot Linux to the new Kernel

To use the new kernel that you just compiled, reboot the system.

# reboot
 
Since, in grub.cfg, the new kernel is added as default boot, the system will boot from the new kernel. Just in case if you have problems with the new kernel, you can select the old kernel from the grub menu during boot and you can use your system as usual.
Once the system is up, use uname command to verify that the new version of Linux kernel is installed.

Fix this error on Debian / Ubuntu Linux

Open terminal and type the following apt-get command to install ncurses:
$ sudo apt-get install libncurses5-dev libncursesw5-dev
Now you should able to compile any program under Linux using ncurses. Here is a sample command to compile and use ncurses:
$ gcc -o output input.c -lncurses
$ ./output

How to install google-chrome in redhat without redhat subscription

Install google-chrome in redhat  Download the .rpm file of chrome https://www.google.com/chrome/thank-you.html?installdataindex=empty&st...